Back in 2009, I did a whole lot of messing around with Linux and Active Directory integration, primarily for Apache. Now that Linux is coming to Windows, I figured I’d brush up on my Linux and Windows Integrated Authentication skills to work with Ubuntu, too.
Clients and Servers
Since 2009, it seems that a couple things have changed in the client realm. In particular, winbind fell out of favor to Likewise Open (which I used to <3) which was bought by BeyondTrust and turned into PowerBroker Open. But that’s since fallen out of favor to the SSSD or “System Security Services Daemon“. SSSD seems pretty cool but everyone hates its name and assumes that its name is keeping it from greater adoption.
Sometimes when researching SSSD, you’ll come across a few mentions of FreeIPA which is similar to Active Directory, OpenLDAP, and ApacheDS. Oh, and I recently found out that Samba4 allows Linux servers to join Active Directory as Domain Controllers (!!) but I can’t tell if it can be a forest of its own (reddit review here).
There are other players I’m leaving out but after a bit of casual research, no others seem to stand out. Ultimately, while there are a number of ways to setup AD/Linux authentication with Ubuntu, it appears that SSSD is the current way to go. Let’s go ahead and set that up.
Before We Begin
There’s an official Ubuntu guide for SSSD and Active Directory, but this one is slimmed down. If you have any issues, you can comment here or reference some of the solutions they offer. First, some assumptions.
- Fresh install of Ubuntu 15.10 Server
- DNS is set to AD’s DNS servers
- The Active Directory domain is base.local
- The test user is base\adadmin, which has domain admin privs on AD
If you’re behind a proxy, apt-get and curl/wget/etc won’t work out of the box. Here’s how to add some proxy variables (kinda like Internet Properties -> Connections -> LAN settings -> Proxy Server) so that you can use these tools.
Also, you’re going to need to make sure that your time is set properly. Kerberos is heavily dependent on time, and will break if your computer is more than 5 minutes skewed from the AD domain.
|
1
2
3
4
5
6
7
|
# Install required packages (ntp service keeps your clock on time)
sudo apt-get -y install ntp ntpdate
# To add your DC to the time server list, edit /etc/ntp.conf, otherwise this should work
sudo service ntp stop
sudo ntpdate -s ntp.ubuntu.org
sudo service ntp start
|
Joining the domain
Joining an Active Directory in Ubuntu isn’t quite as easy as SUSE, but it’s still decently straight-forward.
- Install required packages
- Create and modify sssd.conf
- Modify smb.conf
- Restart services
- Join domain
First, installed the required package using apt-get. I also recommend command-not-found and mlocate, which help you with finding files.
Note, in this tutorial, I use vi. I used to use pico, which became nano, but found that vi could be found across all distributions by default. vi or “vim” can be intimidating, but honestly, I only know about 5 commands and it gets me by. Here’s a nice tutorial on Learning vi progressively.
|
1
|
sudo apt-get install krb5-user samba sssd
|
Next, setup SSSD by creating the file, setting the owner, and changing its permissions
|
1
2
3
4
5
6
7
8
9
10
11
12
13
14
15
16
17
18
|
# sssd.conf doesn't exist by default
sudo touch /etc/sssd/sssd.conf
sudo chown root:root /etc/sssd/sssd.conf
sudo chmod 600 /etc/sssd/sssd.conf
sudo vi /etc/sssd/sssd.conf
[sssd]
services = nss, pam
config_file_version = 2
domains = BASE.LOCAL
[domain/BASE.LOCAL]
id_provider = ad
override_homedir = /home/%d/%u
access_provider = simple
simple_allow_users = ctrlb@base.local,chrissy@base.local
simple_allow_groups = linux-admin,linux-users
|
Note that this config only allows 2 users and 2 groups to gain access. If you remove the last 2 lines, anyone can login. There are a few ways to restrict access but it looks like this is the simplest way.
Next, sudo vi /etc/samba/smb.conf and replace the line workgroup = WORKGROUP with the following:
|
1
2
3
4
5
6
|
workgroup = BASE
client signing = yes
client use spnego = yes
kerberos method = secrets and keytab
realm = BASE.LOCAL
security = ads
|
Time to restart services and join the domain! Here’s a screenshot of my Ubuntu server “ubuntunew” joining my domain, base.local:
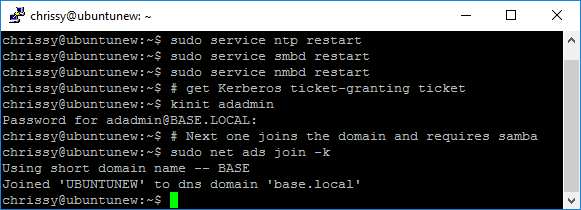
It’s just these commands, nothing scary:
|
1
2
3
4
5
6
7
|
# restart services
sudo service smbd restart
sudo service nmbd restart
# get Kerberos ticket-granting ticket
kinit adadmin
# Next one joins the domain and requires samba
sudo net ads join -k
|
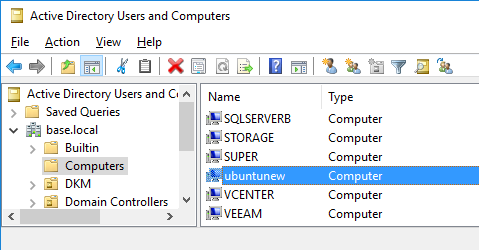
If you have permissions to add computers to the domain and everything went well, then you should now be able to see your Ubuntu server in Active Directory!
Now that everything is setup all nice, start SSSD to do some caching and interception that makes things much smoother somehow.
|
1
|
sudo service sssd start
|
Troubleshooting
If you’re having an issue joining the domain with the error message “Failed to join domain: failed to lookup DC info for domain ‘BASE.LOCAL’ over rpc: An internal error occurred” you can specify the exact domain controller you want to contact (h/t Florent Appointaire).
|
1
|
sudo net ads join -S dc.base.local
|
If you’re getting the error “failed to lookup dc info for domain base rpc undetermined error”, you may have a stale DC. Consider following applicable portions of this tutorial by Microsoft (h/t Rob Sewell)
Login as Windows user
If you’d like to login to the machine as a windows user, as opposed to just grabbing a ticket using kinit, you can either login via SSH or by using su or “substitute user”.
Here’s an example of me using su. First, I logged in to the Linux server as a regular user, then I login as my own Active Directory account “base\ctrlb” by issuing the command su ctrlb. An alternative way is su base\\ctrlb. That extra backslash is intentional, it escapes the second backslash.
E
Alternatively, you can ssh in directly with ssh or PuTTY.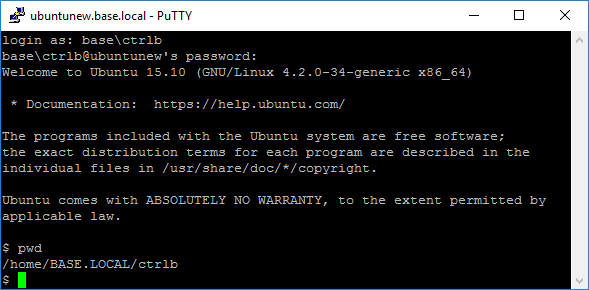
And that’s it! Want to see this all in one shot? Check out the gist.
Chrissy is a Cloud and Datacenter Management & Data Platform MVP
who has worked in IT for over 20 years. She is the creator of the
popular SQL PowerShell module dbatools,
and holds a number of certifications, including those relating to SQL
Server, Linux, SharePoint and network security. You can follow her on
Twitter at @cl.
https://blog.netnerds.net/2016/04/joining-ubuntu-to-an-active-directory-domain/
Join to Domain - Easier - (Example 3)
# Join to domain
# Prereqs
apt -y install realmd sssd sssd-tools adcli krb5-user packagekit samba-common samba-common-bin samba-libs resolvconf
sudo nano /etc/network/interfaces
dns-nameservers 10.32.1.194
sudo systemctl restart ifup@ens160 resolvconf
sudo nano /etc/pam.d/common-session
session optional pam_mkhomedir.so skel=/etc/skel umask=077
realm discover snet.crouse.org
sudo realm join snet.crouse.org
sudo realm join -U "admin" snet.crouse.org
Password for admin: ...............
id domain\\username
sudo nano /etc/sssd/sssd.conf
# line 16: change
use_fully_qualified_names
= False
ad_gpo_access_control = permissive
# Remove the other %d to just have names without domain
fallback_homedir = /home/%u
sudo systemctl restart sssd
Work - CentOS Server Build (CNN project)